Once I finally had this thing built (which was super easy!) I was excited to take photographs. Right away I snapped a lot of pictures but found that the overhead lighting and my lack of blinds in our living room was interfering with my photos. As excited as I was to start using my lightbox I knew it would yield the best photos if I could wait until dark. That didn't solve all of my problems- I still had lots of expirimenting to do.

 Here is my light box set up on the kitchen table with my reflector lamps off and the overhead lights on. The second image is what it looks like with the overhead lights off and the lamps on.
I followed these instructions to create a lightbox that is roughly 20x20 inches. Inside I've laid a piece of white bristol paper (although I also have a sheet of black, green, and a few pieces of patterned wrapping paper just in case). The lamps are professional photography reflectors that I bought in college and I am using 150 watt daylight spectrum bulbs.
Although a light box is a huge step in the right direction, using it without the correct camera settings is like using a video camera with the lens cap on. While I have a great camera, a Canon PowerShot Digital 8.0 mega pixel, the auto settings only produce mediocre photos that require a lot of work in photoshop. Not something I have time for! In order to create the best quality images I had to try several settings on my camera.
Using a manual setting on your camera is the best option when trying to fine tune the lighting and color in your photographs. Since each camera is different I won't go into a lot of detail here, but reference your user manual (or just start pushing buttons, whatever your style) and record on a scratch pad what each setting is as you snap away. It is important to review your photos on a computer screen- not only is it larger, but it is how your photos will eventually be viewed. This helps me compare the images as well so I can choose the best setting. Here are some examples of what my expiriments yielded:

 Photo 1: "Auto" settings, no flash
Photo 2: "Daylight" manual setting, no flash

 Photo 3: "Tungsten Light" manual setting, with flash, exposure at +2/3
Photo 4: "Tunsten Light" manual setting, without flash, exposure at +2/3
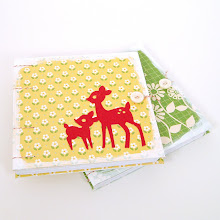
What is amazing is the last two photographs are basically the same setting only one uses flash and one does not. I should also mention that I use macro (looks like a little tulip) on all my photos to help pick up the details. Ideally I would also use a tripod and the timer setting so the camera can't move around a cause blurriness.

In order to pick the best photo, I set them up in photoshop so I can see several at once and minimize the worst ones until I have only one left. If needed I then enhance the sharpness and light balance using photoshop settings.
I ended up using the manual setting: tungsten light, no flash, macro, and +2/3 exposure. Here are some of the before and after shots I was able to achieve:


Love the angle on the first two before and afters! Excellent! Thank you for posting so much detail and all of the photos. I will mark this for future reference! Hey, maybe you could teach a class to the team?
ReplyDelete